Translate in your Language

Spring Decor

Thursday, March 31, 2016

Coconut Ginger Chutney

This particular chutney goes well with Idlis and Wadas. The ginger adds magic to this coconut chutney. I used to not like it when I was young but now I simply love it and cannot do without it when I make idlis or wadas at home.

Here is the recipe:
Ingredients:
for chutney:
  • 1 cup grated coconut
  • marble size tamarind
  • 1 & 1/2 inch ginger roughly chopped
  • salt to taste
  • 2 or 3 green chillies (depending on your spice level)
for tempering:
  • 1 tbsp oil (preferably coconut oil)
  • 1/2 tsp mustard seeds
  • 1 dry red chilli
  • pinch of asafoetida (hing)
  • 7-8 curry leaves
Preparation:
  • In a mixer/grinder add all the ingredients under chutney except salt. Add very little water and make a paste. You can keep it a little coarse too if you like. Keep aside in a serving bowl. Add salt and mix.
  • Make a tadka/tempering, heat oil in a tadka vessel, add mustard seeds, once it splutters add dry red chilli, curry leaves, hing and pour this over the chutney. 
  • Your chutney is ready to be served.
njoY!! happY cookinG!!

Tuesday, March 29, 2016

Mooli Paratha (Radish/Daikon Paratha)

I consider mooli paratha as one of the tastiest and healthiest parathas. It was a struggle to get it right initially but after some practice I am a pro at it now :) I will try to make it easy for you as well. Mooli/Radish is a unique root vegetable that has a pungent-ness to its taste. I have already added a radish leaves pachadi/salad to my blog, which is a healthy side dish. Here while making parathas, the grated white radish root part is used. I think stuffing veggies in parathas is a smart and sneaky way to get veggies that we don't like in our system :) Our ancestors were smart :)
Let's get to the recipe:

MOOLI PARATHA WITH YOGURT AND MANGO PICKLE
Ingredients:
To make Stuffing:
  • 1 & 1/2 cup Mooli (Radish) grated
  • 1 tsp Cumin seeds (jeera)
  • 2 tbsp cilantro chopped
  • 1 tsp mango powder (amchur)
  • 2 green chillies chopped (safe option for kids, use 1 tsp red chilly pwd)
  • 1/4th tsp carrom seeds (ajwain)
  • salt to taste
  • pinch asafoetida (hing)
To make Paratha Dough:
  • 2 cups whole wheat flour
  • salt as per taste
  • 2 tsp oil
Preparation:
  • Grate the mooli (radish) and squeeze out all the water and reserve it to make a dough.
  • Mix all the other ingredients under stuffing and make a mooli stuffing mixture.*
  • In a mixing bowl, add wheat flour, salt, oil and mix it with your fingers. Now add the water reserved from mooli little by little and make a soft dough. Keep aside for 15 minutes.
  • To make paratha, make lemon size balls from dough and roll out into disc (about 3-4 inches). 
  • Place about 2 to 3 tsp mooli stuffing into the centre of the disc. Now pick up edges from all sides and bring it to centre to seal the ball. Press slightly and then gently roll out a paratha. Dust the paratha with wheat flour while rolling out.
  • Heat a tava/flat frying pan, transfer the rolled out paratha. Now apply some oil and cook on med-high flame from both the sides by gently pressing with a spatula till it is golden and crisp. 
  • After a couple of minutes, the paratha color changes to nice brown shade.
  • Serve hot with yogurt, pickles or chutney.
njoY!! happY cookinG!!


Notes:*If the mooli mixture has more moisture content, your parathas may break while you roll. See to it that you squeeze out all the moisture. Many recipes also call for cooking the mooli first, I personally prefer to use raw grated mooli stuffing. You can also add chopped mooli leaves into the mixture instead of cilantro.


Nutrition Fact: Mooli/Radish is helpful in the prevention of cancer as well as fighting against cancer. It is high in antioxidants and fibre. Helps to fight constipation. They are diuretic in nature helping to improve the health of kidney by flushing out toxins through urine regularly. It is high in potassium and low in sodium and therefore, helps in regulating blood pressure. Studies show that it is helpful in asthma too.

Saturday, March 26, 2016

Vangyache Kaap (Brinjal/Baingan Roundel fry)

I cannot tell you how much I love these brinjal kaaps. It is a Maharashtrian style of frying the brinjal slices. Some dishes are simply heavenly- period :) Brinjal being one of my favorite vegetables, I will endorse this dish :) When added in a meal as a side dish it simply multiplies the joy and nutrients into your meal. Not only that, the color and look it brings out on the plate is very pleasing too :) if you care about it hehe

Let's get to the recipe:
VANGYACHE KAAP
Ingredients:
  • 10 roundels of a brinjal
  • 4 tbsp rice flour
  • 1 tbsp gram flour (besan)
  • 1 tbsp chilli powder
  • 1/2 tsp turmeric powder (haldi)
  • 1/2 tsp cumin powder
  • 1/2 tsp coriander powder
  • 1/2 tsp mango powder (amchur)
  • salt as per taste
  • 1 tbsp lime juice optional
  • oil to fry
Preparation:
  • Soak the brinjal slices in the salt water for 10 minutes. Drain the water and keep aside.
  • Make a mixture of flours and powders together and mix everything.
  • Heat a frying tava/ cast iron pan and add a little oil, spread it evenly on the tava.
  • Take brinjal roundels one at a time, coat it with the flour mixture on all sides and place it on a hot tava. Reduce the flame to medium. Add more oil over the top of the roundels and let it cook for 2-3 minutes. Flip over and cook for another 2-3 minutes. Once it's cooked take it out and place on paper towel. 
  • Serve hot with rice, curry. You can squeeze some lime juice on top. It tastes fantastic!
njoY!! happY cookinG!!


Nutrition Facts: Fibre and antioxidants are just two of the nutrients that make brinjal a food that can keep cancer at bay. Brinjals are great for weight loss as they are low in calories. Being rich in fibre, potassium, vitamin B-6 and phytonutrients like flavonoids, this vegetable lowers the risk of heart disease. Studies say it helps one to quit smoking.The antioxidants and vitamins present in brinjals can help you have a great skin.

Friday, March 25, 2016

Ragi Poori (Finger Millet Poori)

Poori is a delicious deep fried Indian bread. It can be had for breakfast, lunch or dinner. Well, anything fried qualifies for double yumminess :) :) Making fluffy, round n soft poori is an art ( yeh ek art hai- am saying it like Deepika Padukone said it in HNY :)) It is usually enjoyed with either vegetable curry or sweet dishes like shrikhand or aamras. I don't make it often because I cannot stop eating at 1 or 2 poori's, I have to eat many :) So I try to add healthy ingredients to it. This one here is a combination of whole wheat flour, ragi flour and it turns out yum!
Let's check out the recipe:
Ragi Poori
Ingredients:
  • 1/2 cup whole wheat flour
  • 1/2 cup ragi flour
  • 1 tbsp all-purpose flour
  • 1 tbsp semolina (rava)- (optional)
  • pinch salt
  • 1 tbsp oil
  • oil for frying
Preparation:
  • In a mixing bowl add all flours and semolina, salt, oil and mix everything with your fingers.Add just enough water to make a stiff dough. (always add little water at a time while kneading)
  • Rest the dough for 15 minutes.
  • Now make small balls and roll out discs of about 4 to 5 inch in diameter. Don't roll out too thin because it won't puff up.
  • Heat oil in a frying pan on a high flame. Once the oil is hot, reduce the flame to medium and slowly slide 1 or 2 poori's at a time. With a slotted spoon press against the poori slowly so that it puffs up. Turn it over and fry for another minute. Take it out once it is golden brown on both sides. Place it on a paper towel to drain away the extra oil. 
  • Serve hot with your favorite side dish.
njoY!! happY cookinG!!
Nutrition Facts: 
Ragi is high in protein and minerals. Helpful in controlling diabetes, keeps one younger for a long period(cross-linking of collagen), reduces bad cholesterol, also has anti-microbial properties and has been found to act against a number of bacteria including Bacillus cereus, which causes food poisoning, Salmonella sp., which causes a typhoid-like fever etc.


Puffed up Poori :)

Monday, March 21, 2016

Jeer-Mirya Kadi (Cumin-Peppercorn Curry)

On the day, you want to give lentils a skip you can try this delicious curry, a welcome change from everyday routine food. This is a Konkani dish from Karnataka. It is a very simple preparation and tastes very yummy. The combination of cumin(jeera) and pepper(meeri) along with garlic tempering makes it a healthy curry. It can be had as soup also.  My mom made it almost every other week during my childhood days. Distinct taste and flavor makes it a unique curry and I enjoy it with papads and pickles the most.
Let's check the recipe:
Ingredients:
  • 1 cup grated coconut
  • 1 tsp cumin (jeera)
  • 6-7 peppercorns (meeri)
  • 4-5 red dry chillies
  • small marble size tamarind 
  • salt to taste
  • 1 tbsp oil (preferably coconut oil)
  • 4-5 garlic pods
JEER_MIRYA KADI
Preparation:
  • In a frying pan, add 1 tsp oil and roast cumin seeds, red dry chillies and peppercorns for a couple of minutes.
  • Grind it with coconut and tamarind. Transfer the masala to a pan. Add water to bring it to the level of consistency you like. I like it a little thin. Add salt as per taste and bring it to a boil. Simmer the curry for a few minutes, say 4-5 minutes.
  • In a tempering pan, add oil, add chopped garlic and saute quickly. Once it starts turning brown immediately pour it over your curry and close the lid so that all the flavors stay put. 
  • Serve hot with rice.

njoY!! happY cookinG!!

Nutrition Facts: We all know by now that Coconut products are found widely in the aisles of supermarkets. Once hailed as a villain has turned into a hero now. Anything consumed in proper quantity will prove beneficial for health. Coconut basically is gluten free, nontoxic, hypoallergenic, contains antibacterial, antiviral, antifungal and anti parasitic healing properties. It aids and supports overall immune system functions. It is high in dietary fiber. Also reduces your sweet cravings.
Cumin has many properties too. Mainly it aids in digestion, improves insomnia, common cold etc.
Peppercorns are a rich source of manganese, iron, potassium, vitamin-C, vitamin K, and dietary fiber.

Saturday, March 19, 2016

Nankhatai (Indian shortbread cookies)

These are our own Desi shortbread cookies. Vegetarians can do a happy dance:) as these beauties are eggless. The best part I like about nankatai is, it is a very quick recipe. Did you know that the word Nankhatai is derived from Persian word Naan meaning bread and Khatai from an Afghan word meaning Biscuit. I didn't know either, it's a wiki information Shhh...:). You can make these and store for few days. The aroma while baking these Nankhatais takes me back to my sweet childhood days. I used to take nankhatais and donuts to school for lunch on the days we had early dismissals :)
I say bake them and make some happy memories with your kids at home :)
Here is the recipe:
Ingredients:
  • 3/4th cup all-purpose flour (maida)*
  • 2 tbsp chickpea flour (besan)
  • 1/2 cup ghee (clarified butter) 
  • 1/2 cup castor sugar (powdered sugar)
  • handful chopped nuts (cashews, pistachios or almonds)
  • 1/2 tsp baking soda
  • 1/4th tsp cardamom powder
  • 1/2 tsp vanilla essence (optional)

Preparation:
  • In a mixing bowl add all purpose flour, besan, baking soda, cardamom powder.
  • In another bowl, whip ghee and powdered sugar together with a hand mixer till it becomes a smooth mixture (1 minute on low speed and 2 minutes on high speed). Add vanilla essence if you like that flavor and whip again for few seconds.
  • Slowly fold the flour mixture into the sugar mixture and knead together. Add 1/2 the portion of chopped nuts in the mixture while kneading. You basically get a crumbly mixture. 
  • Now make small size balls and press on top with your palm to flatten it a bit, and place the remaining nuts on top as a garnish if you like.
  • Place it on the baking sheet with 1 inch gap. You approximately get around 24-25 Nankhatais.
  • Bake at 350F/180C for 10-12 minutes. Keep a close eye after 9 minutes. It can burn easily. 
  • Take it out and let it rest for 5-10 minutes cause they are very soft and can break if you try to eat it immediately. 

njoY!! happY cookinG!!

Note*: You can make it using whole wheat flour and all-purpose flour taking 1:1 proportion. It tastes yum but comes out less flaky.


Thursday, March 17, 2016

Ragi Mudde (Finger Millet Balls)


Ragi (Finger Millet) is a cereal which is very rich in protein and minerals and we must include this in our regular diet. I have found a new permanent place for Ragi in my pantry :) Its original taste and texture itself is so good that you need to work very little around it to make it taste yummy. Various dishes can be made out of this humble grain. It is said to be originated in Africa and has been cultivated in India from past 4000 years.  It's an ancient grain where new age era has kind of forgotten its importance. This dish is called Ragi mudde/Ragi Sangati/Ragi Kali etc and is popular with rural folks of Karnataka, no doubt they are very healthy and strong people :) It can be served with spicy curries like sambar, chicken curry etc or even buttermilk. Ragi dosas and Ragi rotti are my other favorite dishes.

Let's get to the Ragi Mudde recipe:


Ingredients:
  • 1 cup ragi flour (finger millet) 
  • 2 cups water 
  • salt to taste (1/4 tsp) 
  • 1 tsp ghee
  • 1 green chilli chopped

Optional tempering:
  • 1 tsp ghee (clarified butter)
  • 1/2 tsp mustard seeds
  • 1 tsp fried gram dal (phutani)


 Preparation:
  • Bring water to a boil in a vessel. Add salt and ghee, stir it once. Add ragi flour, close the lid and cook for 1 minute on a med-low flame.
  • Now reduce the flame to low, add chopped chillis, and now with a flat mouth wooden ladle stir the ragi flour in water in quick circles mixing it together till no lumps are seen. Keep stirring/whipping till you get to a paste consistency. (stir for good 3-5 minutes) Close the lid and let it cook for another 2-3 minutes.
  • In the meantime make the tempering/tadka which is totally optional (I wanted more flavors :)), heat ghee, add mustard seeds, once it splutters add gram dal stir quickly and pour it over ragi mixture.
  • Mix everything nicely and switch off the gas. Let the mixture cool down a little bit till your hands can handle it. Grease your hand with little ghee and make bite size small balls from ragi mixture. 
  • You can serve it dipped in buttermilk or sambar or chicken curry. Pour more ghee over it:) It tastes yum! It's actually swallowed as whole (mudde meaning lump) and not chewed. But I cut it and eat with the curry :) That's just me heeee


PS: I have Sambar Curry in the picture!


njoY! happY cookinG!!


Health Benefits: 
Where do I begin :) It is high in protein and minerals. Helpful in controlling diabetes, keeps one younger for a long period(cross-linking of collagen), reduces bad cholesterol, also has anti-microbial properties and has been found to act against a number of bacteria including Bacillus cereus, which causes food poisoning, Salmonella sp., which causes a typhoid-like fever etc


Wednesday, March 16, 2016

Batata Talasani (Spicy Potato Dry Vegetable)

This fries or straw cut potato vegetable dish is one of the first dishes I learnt to make after I got married :) Very easy and very yummy tasting batata talasani is a Konkani recipe. Lots of curry leaves, garlic along with asafoetida and chilli powder go in the making of this spicy talasani which in return makes 'Potato' the hero of this aromatic flavorful dish. I actually like this to eat with methi parathas(theplas) too, not sure why but the combo is deadly :)
So let's get to the recipe:
SPICY POTATO DRY VEGETABLE DISH
Ingredients:
  • 3 med* size potato (fries or straw or matchstick cut)
  • 1 or 2 tbsp oil
  • 1 tsp mustard seeds
  • 1 tbsp chilli pwd
  • 1/2 tsp turmeric (haldi)
  • 1/2 tsp asafoetida
  • 2 sprigs of curry leaves
  • 3-4 big pods of garlic chopped
  • salt as per taste
  • handful of chopped cilantro
  • 1 tsp lemon juice
BATATA TALASANI
Preparation:
  • In a non-stick pan, heat oil, add mustard seeds, once it starts spluttering, lower the flame to med-sim, add garlic, curry leaves saute quickly for few sec, add asafoetida, turmeric, chilli pwd, saute quickly else it will burn.
  • Add potatoes, mix with the masalas, add salt as per taste and mix again. Close the lid and on low flame cook the potatoes till done for 10-12 minutes. Stir the potato mixture in between.
  • Garnish with the lemon juice and cilantro. Serve hot with Roti or Rice.

njoY!! happyY cookinG!!

*Note: You should get about 3 cups of fries cut potatoes. Please adjust chilli pwd as per your taste. I like it spicy :)

Nutrition Facts: The humble potato is vastly underrated in terms of nutritional benefits. Due to the increased interest in foods that are low-carb or low-glycemic index, the potato has unjustly earned a bad reputation. Potatoes consumed in simple roasted, grilled, boiled, steamed manner with little or no oil/butter is very healthy and nutritious for health. It is loaded with calcium, phosphorus, zinc, magnesium, iron that helps in having strong bones. It has vitamin B6 which supports heart health. Choline is a very important and versatile nutrient in potatoes that helps with sleep, muscle movement, learning and memory.

Tuesday, March 15, 2016

Khou Suey (Burmese style curry-noodle soup)

According to me, this Burmese noodle soup known as Khou Suey is a marriage between Indian and Thai curries :) seriously, I am not joking. There are various versions on how to make it. It's a coconut milk based soup with curry flavors. You can have fun adding a different combination of garnishes. I really enjoyed making this dish and it's a must try recipe. Thanks to my friend Nitu, who asked me to try it out after she tasted it at an international fest. This bowl meal is way too delish to not give it a try :) I have used chicken as the main ingredient, one can use shrimp or just plain vegetables.

Let's check out the recipe:

Ingredients:
For Curry Soup
  • 4 boneless chicken thighs cut into bite size pieces
  • 2 cups coconut milk
  • 1 cup chicken broth
  • 1 tbsp besan (chickpea flour)
  • 4-5 pods of garlic chopped
  • 1 inch ginger chopped
  • 1 onion chopped
  • 1/2 tsp turmeric (haldi)
  • 1 tsp chilli powder
  • 1/2 tsp garam masala powder
  • 1 tsp thai red curry paste
  • 1 tbsp fish sauce (optional)
  • 1 tbsp sugar (optional)*
  • 1 stick lemon grass crushed 
  • 1 tbsp oil
  • salt to taste
For garnish
  • cilantro chopped
  • mini sweet peppers chopped/julienne cut
  • fried noodles 
  • spring onions chopped
  • crushed peanuts
2 bowls of any cooked plain noodles (I used Egg noodles)

Preparation:
  • Heat oil in a pan, add ginger, garlic and quickly saute for a minute, add chopped onions and saute till they turn light brown. 
  • Add chicken thigh pieces along with chilli pwd, turmeric, garam masala, thai curry paste and mix everything nicely. Add chicken broth, salt to taste and if you are using fish sauce, add it now. Mix everything together and bring it to a boil. 
  • Now make a paste of besan adding some water and pour it in the curry while stirring. This paste basically gets thickness to the curry. Add coconut milk and a stick of lemon grass. Cook till chicken is done. About 15-20 minutes. Your curry is ready.
  • Serving method: Take a big mouth bowl, add noodles in the centre, then pour the curry soup over it along with some chicken pieces, add the garnish- fried noodles, cilantro, spring onions, sweet peppers, crushed peanuts. Now all you have to do is dive in to enjoy this wholesome deliciousness!
NjoY!!

Note:* You can add sugar if you like that hint of sweetness. I added it in my kids soup bowl and he loved it. You can skip the fish sauce and lemon grass if you don't have it though it adds great depth of flavors to the curry.

Nutrition Facts: Chicken is loaded with proteins which aids to build muscles, it also helps to reduce PMS symptoms :) yay!! It helps to build your bones strong, boosts immunity etc

Monday, March 14, 2016

Vegetable Rice Pulao

A quick rice pulao recipe that can make any woman's life easy is here to stay:) This pulao is a quickie, more or less like a 1 pot meal. The advantage being you can either put in more efforts on cutting fresh vegetables and making it an irresistible pulao or use frozen vegetables which most of us have tucked somewhere in the freezer :) to make a quick pulao and serve the hungry battalion at home :) Everyone will be happy with the end result.
VEGETABLE PULAO
Ingredients:
  • 1 cup rice (preferably Basmati)
  • 2 cups water
  • 1 1/2 cups of vegetables (frozen or freshly cut- beans,cauliflower,carrots,corn,peas)
  • whole garam masala ( 4 peppercorns, 4 cloves, 1 inch stick cinnamon, 1 bay leaf, 1 cardamom crushed)
  • 1 tsp mustard seeds
  • 1 tbsp ghee(clarified butter)
  • 1 tbsp oil
  • 2-3 pods of garlic chopped
  • 1 tsp chilli pwd
  • 1/2 tsp turmeric(haldi)
  • 1/2 tsp cumin pwd
  • 1/2 tsp coriander pwd
  • 1 tsp garam masala
  • salt to taste
  • handful chopped cilantro
  • 1-2 tbsp grated coconut to garnish

Preparation:
  • Rinse and soak rice for 30 minutes, then drain and keep aside.
  • Cut all the fresh vegetables and set it aside.
  • In a wide bottom non-stick pan, heat ghee and oil together, add mustard seeds, as they splutter add whole garam masala, saute for a few seconds, then add garlic and saute for another few seconds.
  • Add the vegetables, quickly saute for a minute, add rice saute again for a couple of minutes.
  • Now add all the powders (chilli, cumin, coriander, haldi, garam masala), salt and mix everything. Add water and mix everything one last time.
  • On low/sim flame cook for 22-25 minutes with a covered lid.
  • switch off the gas and let the rice sit for 5 more minutes. Your rice is ready to be served.
  • Serve with yogurt raita, pickles, papad etc.
njoY!! happY cookinG!!

Note:* Adjust the spices as per your taste.

Health Benefits: Rice with Vegetables will you give much-needed carbohydrates along with vitamins and minerals.

Peanuts-Fried Gram Dal Chutney

This chutney is made with peanuts and roasted bengal gram dal (phutani). Lots of people prefer not to use coconut and hence came the substitutes into picture :) This sure makes a nice healthy chutney that can go with Dosas, Idlis, plain Roti or on Sandwiches.
Let's see how it is made,

Ingredients:
for chutney:
  • 1 cup fried bengal gram dal (phutani)
  • 2 tbsp peanuts
  • 1 inch ginger
  • handful of chopped cilantro
  • marble size tamarind
  • salt to taste
  • 2 green chillies
for tempering:
  • 1 tbsp oil
  • 1/2 tsp mustard seeds
  • 1/2 tsp urad dal
  • 1 dry red chilli
  • pinch of asafoetida (hing)
  • 7-8 curry leaves
Preparation:
  • Dry roast the peanuts and bengal gram dal on a pan for a few minutes.
  • In a mixer/grinder/blender add all the ingredients under chutney except salt and make a paste. You can keep it a little coarse too if you like. Keep aside in a serving bowl. Add salt and mix.
  • Make a tadka/tempering, heat oil in a tadka vessel, add mustard seeds, once it splutters add urad dal, brown it and then add dry red chilli, curry leaves, hing and pour this over the chutney. 
  • Your chutney is ready to be served.
njoY!! happY cookinG!!


Nutrition Facts: Fried split bengal gram dal(phutani) is high in fiber and helps to lower cholesterol. It also has a very low hypoglycemic index, which is important for those with diabetes. It is a helpful source of zinc, folate, calcium and protein and is low in fat content. This dal is extremely delicious in taste, full of nutritions and can be digested easily.
Peanut is a universally loved nut :), it has anti-oxidants just like that found in fruits that helps to keep a healthy heart. It reduces the risk of stroke. It also lowers weight gain.


Friday, March 11, 2016

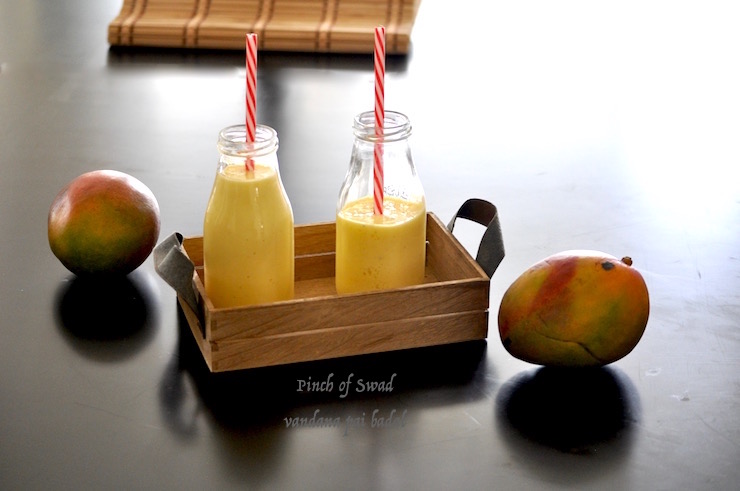
Mango Lassi - Summer Mocktail


Yay!! Mango season is here! Today is my lucky day as I got 2 boxes of mangoes which are just ripe and ready to be eaten. If someone gives me a choice between a Mango fruit and a dish made with Mango without giving a second thought I will choose the fruit. But lassi is an exception :) Made with yogurt and milk, this drink is a rocking summer mocktail. It just takes a few minutes to prepare and after relishing it, I can bet that your day will pass by blissfully :)


I have my blissful moments looking at my son enjoying that juicy delicious fruit. The dedication with which he eats the mango is exactly the way I used to eat...sucking away on that gigantic center seed/pit till no flesh is left on it hehe. He simply loves mango lassi. It makes a healthy and filling after school drink.

So let's take a look at this gorgeous MANGO LASSI recipe:
MANGO LASSI
Ingredients:
  • 1 cup mango pieces 
  • 1 cup thick yogurt
  • 1/2 cup milk
  • 1 tbsp sugar or honey (adjust depending on the sweetness of the mango)
  • pinch of cardamom
  • pinch of saffron (optional)
Preparation:
  • Add mango pieces in a blender and grind to a smooth paste.
  • Add yogurt and grind again blending it together.
  • Now add cardamom, milk and pulse few times. 
  • Adjust the thickness as per your liking. If you want your lassi to be more orange in color, add saffron.
  • Your delicious lassi is ready.


Note: If fresh mangoes are not available don't be disheartened, you can use a store bought good quality mango pulp too.

njoY!! happY cookinG!!


Health Benefits: Mango is considered as the king of the fruits in Indian subcontinent. It's an exotic tropical treat which can be enjoyed over the summer season everywhere. It really is a special fruit rich in pre-biotic dietary fiber, vitamins, minerals, antioxidant compounds. According to new research study, mango fruit has been found to protect against colon, breast, leukemia and prostate cancers. It is abundant in vitamin A.

Thursday, March 10, 2016

Red Velvet Cupcakes

These cupcakes are hands down one of the gorgeous and sexy cupcakes I have made. They definitely don't need any introduction. Make these on special occasions to add more drama and it may be the show stopper of your evening :) It is a time-consuming recipe but the end result makes it all worth it!
This has become our anniversary special treat:). My kitchen smells happiness when I get busy making cupcakes only during birthdays and anniversaries :) I indulge in making these decadent pastries once in a while.
So let's get to the recipe:
RED VELVET CUPCAKE
Ingredients:
For the cupcake:
  • 1 1/4 cups of cake flour**
  • 1/4 teaspoon baking powder
  • 1/4 teaspoon salt
  • 1 tablespoons unsweetened cocoa powder
  • 1/4 cup unsalted butter, at room temperature
  • 3/4 cups granulated white sugar
  • 1 large egg at room temperature
  • 1/2 teaspoon pure vanilla extract
  • 1/2 cup buttermilk
  • 1 tablespoon liquid red food coloring
  • 1/2 teaspoon white distilled vinegar
  • 1/2 teaspoon baking soda
For the Frosting:
  • 1 8oz cream cheese
  • 1/2 cup powdered sugar
  • 3/4th cup whipping cream.
**( 1 cup cake flour = 3/4th
cup all-purpose flour + 2 tbsp corn starch)

Preparation
  • In a mixing bowl, mix all the dry ingredients flour, salt, baking powder and cocoa powder.
  • In another big bowl, add butter and whisk for 1-2 minutes using a hand mixer, add sugar and whisk again for 2-3 minutes, then add an egg and incorporate it nicely by whisking some more. Add vanilla essence and whisk till nice and smooth.
  • Make a mixture of buttermilk and red color. Add flour and red buttermilk alternately in parts into the butter mixture whisking on low speed, in about 4 additions, beginning and ending with the flour.
  • Scrape down the sides of the bowl with a rubber spatula and whisk again till you incorporate everything and get a smooth cupcake batter.
  • In a small cup mix vinegar and baking soda, it will fizzle a bit, now quickly fold into the cupcake batter.
  • Arrange a muffin tray and place muffin paper cups/foil cups. Fill the cups with the cupcake batter. 
  • Preheat the oven for 350F/180C, and bake for 18-22 minutes (check with a tooth pick, when you stick it in the centre and take out, it must come out clean) I baked exactly for 20 minutes. Take it out and let it cool.
  • Now make your frosting, whisk cream cheese first, then add sugar and whisk some more.
  • Add whipping cream slowly and whisk until it gets thick enough to pipe.
  • Use a zip lock bag and make a tiny cut at one corner, insert a thin star shaped icing tip(nozzle) to decorate the cupcake with the icing. Pour the icing in the zip lock bag and make designs of your choice.
  • You can also use back of the spoon to spread frosting on the cupcake. Use your imagination. I took out a little portion from one of the cupcakes and added the crumbs on top of the frosting, I simply love drama when it comes to presenting and eating :)
  • Makes 12 big cupcakes or 24 small ones. Your yummilicious red velvet cupcakes are ready!
         Njoy!!                


Note: Baking can be little scary to some people. Don't be, its definitely time consuming and lots of clean up after baking:)(that's my sob story about baking :)) All you have to do is measure the ingredients correctly and follow the instructions properly...(dont roll your eyes :)) Give it a try and let me know! Happy Baking!


Adapted from Stephanie's joy of baking.

Tuesday, March 8, 2016

Coastal SeaFood Lunch

Somedays I feel like having a simple seafood meal on my plate and nothing else. It is a soul-satisfying experience for me. I miss my mom and her fish curry a lot. So whenever I make it, it's a flashback day for me :) I remember when I was a teenager, my sister and I took turns to lend a helping hand to my mom by grinding the curry masala on a special stone grinder. The taste of that cooking used to be simply amazing. Even today at my mom's place they use a wet grinder to make masala. At my grand mother's house, the curry was prepared in the clay pots and that infused amazing aroma and the taste of the curry was so magical. No kidding! Ahhhh....all this talk is getting me nostalgic.

Let's just get to the recipes:

Follow the links given below:
Weekend special meal or feel good meal on any given weekday!

SEAFOOD PLATTER


Picture of

<-----Stone grinder (Ragado)


                       and Clay/Mud Pot ----->


Nutrition Facts: Fish is low in fat and high in protein content. It helps against cardiovascular diseases, prostate cancer, age-related vision loss and dementia. It's a good source of vitamin D, protein, some B vitamins and selenium. It's also a rich source of omega-3 fatty acids, a type of fat that is good for our health. Also said to be helpful in reducing symptoms of rheumatoid arthritis.

Recent Posts